Sunday, August 2, 2026

South of Midnight's Foliage Wind and Interaction System


Sunflowers sway in the breeze in the flooded farmland level.
When we were considering a foliage wind and interaction solution, I was the only technical artist on the team. So we needed a solution that could be maintained by one person, that was easy for environment artists to work with, could withstand LOD switches, could represent wind ranges up to hurricane force winds, and could perform at 60 fps on Xbox Series S. Simple!

Researching the Problem

The big example that everyone knows about is the elephant plants in Uncharted 4. I read a few different papers on the subject but Naughty Dog's The Technical Art of Uncharted 4 (2016) was the most helpful in delineating the problem space, and suggesting the sufficiency of a material based solution for wind and interaction.

For our timeline, it seemed like an off the shelf solution would be helpful, at least to kick start us in the right direction. We found that Epic had supplied their own wind system called Pivot Painter in two versions. These node graphs were complicated but not too difficult to understand. There were also marketplace plug ins that expanded on the Pivot Painter concept. We ended up adopting Unified Interactive Physical Foliage, because it seemed like it supported wind, player interaction, and other forces we could utilize for magic spells.

Rigging the Foliage

A big velocity problem for projects with a lot of foliage is getting pivot information for branching tree structures. The Pivot Painter plug ins had semi-automated pivot painting work flows, but this was a big ask from such a small team. I suggested we see if we could partner with our foliage outsourcer to develop a Houdini based tool and deliver the trees pivot painted from their end. The Tech Director liked this idea, as software outsourcing is very common, and the outsourcers agreed.

In our tests, we found the pivot painted foliage to be extremely resilient to Simplygon's decimation, and optimizing and LODing worked without much fuss. The down-rezzed trees animated perfectly without any need for a second pass to fix broken animations. Adding geometry or editing uvs was not possible without rerunning the Houdini tool, however.

For more information about how we utilized Simplygon's tools, check out our Customer Story on the Simplygon blog.

Wind and Interaction System


UIPF has two main branches: the physical foliage branch which animates skeletal meshes based on physical interactions and collisions, and the pivot painter branch. We cut out the physical interactions since they seemed unnecessary for our project, and were potentially a performance liability.

Once we had rigged foliage, we could begin tuning the wind and interaction animations.  Since the number of number of parameters in the material was extraordinary, I viewed this as my responsibility, but I did have help from the outsourcing Tech Artist and the environment artists with the wind.  There were many plants. In the process, we found that certain features were unnecessary and others were inadequate, and the vertex shader was accessing too many textures over-all. In addition, the grass wind solution was using Unreal's Simple Grass Wind which was unfortunately not sufficient for the quality we had in mind for our project.

Material Hierarchy and Shader Permutations

Never let outsourcers name your parent materials.

The two competing priorities of limiting shader permutations but making the material hierarchy meaningful and easy to use was in all-out war here. This is the one system where we accepted more permutations to allow for easier management.

The hierarchy was based on the assumption that similar tree or plants would respond to wind and being pushed-through similarly. We had a branching structure from the master material that split between grass, plants, and trees. For the plants and trees, we had a master for each species which would contain most of the parameter overrides for the behaviour. Some of our species had a wide variety of morphologies, such as the oak trees, which required tuning per example.

Grass Wind


Both the prototype grass wind solution that existed in the project prior to my involvement, and the solution provided by Unified Interactive Physical Foliage used the stock Unreal Simple Grass Wind. If you're familiar with it, you know it has a very distinctive 'winding and unwinding' circular motion which feels very mechanical. What's more, the circular motion is only on one plane regardless of the wind vector, so the motion is very different depending on alignment of the wind vector, varying from a spiraling motion to a kind of 'wax on, wax off' wiping motion, if you get the reference.

I decided to attempt a vertical bending motion based on a sum-of-sines- a very, very simple application of Fourier Series. I thought it would match the bendy motion of the pivot painter wind better. The function packs seeds for 4 sine waves of different speeds, amplitudes, and wavelengths into a vector 4 and converts them into rotations based on the vertex xy position and the z position of the object world space location. I felt like this gave the best representation of individual blades of grass in a grass card. The grass assets were constructed with AO in a vertex colour channel. I found this served well as a vertical mask to modulate the wind intensity near the ground. Another option would have been to use vertical component of the object bounds as a linear gradient.

At this point, the wind resembled uniform sine waves marching across the level in lines from a distant source, whose location was defined by the wind direction vector. I needed to add some randomness to it, but the unreal machinery for PerInstanceRandom wouldn't work because this had to work with GrassTypes, FoliageTypes, as well as hand-placed actors. In order to get pseudo-random offsets per instance or per component, I remembered an old trick. I could use the world space transform of the piece of foliage as a source of randomness. Transforming 0,0,0 in local space to world space worked well to get the world space pivot location of the hierarchical instanced static mesh instance, or static mesh component of an actor. I used the fractional component of the world space locations as a source of 'random' offsets.

Optimizations

When we were optimizing the foliage systems at various times in the project, we found that there was considerable opportunity to lighten the interaction and wind computational load. The interaction system sampled a render target that kept track of the player position in the level. This render target needed to be sampled by the vertex shader in every pass- in the pre-pass, in the main pass, and in shadow depths.

The first thing we did was decide on a maximum size for foliage that Hazel could pass through. This was primarily design driven as it had huge implications for metrics and traversal. On the tech art side, we optioned to disable the interaction system on species of foliage that Hazel could not pass through based on their size. This included all trees, which reduced the computational load considerably. Similarly, there was a minimum size for grass where interaction didn't read at all. So, for very short grass patches, we disabled the interaction system in the material as well.

The next thing to consider was foliage that could be interacted with, but was sampling the render target unnecessarily. We reasoned that Hazel could not interact with foliage that was far away. And, over a certain distance, the foliage would have stopped swaying after being disturbed. We didn't want to attempt dynamic switching, but instead found another way in: the LOD system. The LOD system already keeps track of object distance, and different LODs can't be batched together. So, we decided to make a lighter material tree and assign these materials to interactable foliage meshes in LOD 2. I wrote a python script that analyzed the foliage folder structure, correlated foliage meshes and their materials, made an alternate material tree with interaction disabled, and assigned the lighter materials to all LODs after LOD1. This script would have to be rerun if the LODs of a piece of foliage were regenerated, but it seemed like a small inconvenience. Further enhancements to this process would be to have the Simplygon LOD system kick off the script after building LODs, but this was very late in the project and the number of times it would have to be run was very finite.

Unexpected Use Case

Pivot painter data enabled this material driven regrowth effect.

Later in the project, the cinematics called for a dead weeping willow tree to magically sprout fronds and come back to life. It was a big moment, and we needed a compelling way to add foliage back onto a dead tree. Connor, VFX Artist extraordinaire, was talking about some kind of unfurling motion- having the fronds grow and uncurl themselves. I realized right away that we had all the ingredients to make this happen right in the material, because we had the pivot points of all of the fronds stored for the wind and interaction data.

So, working with Connor, I set the basic mechanism for how the will fronds could grow and unfurl. He combined this technique with others to realize the needs of the cinematic without the need for complex rigging or a whole new system bespoke for that one use-case.

Below you can see Connor's wonderful work on the cinematic effects.


Monday, July 13, 2026

South of Midnight's Volumetric Fog Actor


Volumetric fog encircles a tobacco barn.  Image courtesy of Room 8.

Early in my tenure on South of Midnight, it was communicated to me from the Art Director and Lighting Artist that fog was going to be extremely important to realizing the art direction of South of Midnight. Early on, I had Ghost of Tsushima in mind as a good example to follow, but also games like Quantum Break which had a pretty compelling mixture of particles and volumetric fog. The fog of Quantum Break was achieved in 2016 and on the previous generation of hardware, so it a fog system that is at least partially volumetric seemed viable. Around the same time in 2017, the immutable Ryan Brucks made a blog post about the then-new volumetric fog material system in Unreal Engine 4.

The lighting artist, Miguel, who is a bit of an artistic powerhouse in his own right, described a system that was used to achieve the fog on Guardians of the Galaxy. He wanted a 'Fog Volume' he could place to control the mood of locations by virtue of local atmospheric conditions. He requested a volume that could add a homogenous field of exponential height fog. After reading some documentation, I thought I could do better than that. It didn't seem that much of a leap in complexity to add local detail to the fog volume, so I set out to over-deliver.

So, after talking with the relevant stake holders, the primary user of the system, consulting the official documentation and looking at what else is out there, I went off to nail down the volumetric part.


The Fog

Spooky fog hangs thick in the air in the swamp.  Image courtesy of Room 8.

Out in the world, fog can produce all kinds of visual effects and be evocative many different moods. It can be mysterious, beautiful, or foreboding. Likewise, just like clouds, it can be blanket-like, billowy, or wispy. Since large parts of the game would take place in magical, mysterious, or threatening environments, I really wanted to capture the wispy tendrils fog can have. I felt if I could achieve that, the fog volume would be versatile enough for many different kinds of scenarios.

In the volumetric plug in released by Epic, I saw that there were a couple of technologies demonstrated that could be useful: 3d textures and their samplers, Voronoi and curl noise fields, various ways to use noise to modulate per-pixel UVs. I thought that the careful use of these technologies could produce a wide range of effects, including the wispy fog I was after. The exponential height fog already worked with the lighting systems in unreal, so it seemed like we were well on our way to having light-reactive, art-directable, local fog in our game.

The Volume

The Volumetric Fog Actor adds atmosphere to our hurricane sequence.

The documentation suggests using fields of particles to drive the effect. In fact, this was the only driver available in Unreal 4.17. We were working in 4.27, and I was skeptical of the performance overhead of filling a volume with particles. So, I attempted to drive the fog with a cube shaped mesh. To my surprise, it turned out, this worked well from outside of the cube as well as inside. Placing cubes as fog volumes seemed like a quick win, requiring only basic systems to work and very little in the way of development time or future maintenance burden.

The Actor

The Fog Volume Actor in all its simplistic cubic glory.

The Actor was a very simple affair. The user could elect to use a custom material instance with settings they already set up, or they could use the params in the actor's details panel to tune the material's properties per-instance. I attempted to use custom primitive data in the static mesh component to drive the material params, but at the time there was an engine bug that prevented custom primitive data from working. Unfortunately, this bug was never corrected so we used dynamic material instances instead.

The Material

The 'wispy motion' I was trying to achieve.  This example is in 2D mode.

The material utilized many concepts and functions from the Volumetric engine plug in. It utilized Voronoi noise for a adding cloud-like shapes, and curl noise for adding turbulence and achieving the wispy cloud effect and motion I was attempting to achieve.

It had static switches and master material instances for each of the three modes: 3D, 2D, and flat (0D?).

Aside from the noise, the material had logic to fade the fog extinction to 0 at the bounds of the cube, along each axis: X falloff, Y falloff, bottom falloff and top falloff.

The initial material had the ability to make fake shadows in the fog volume by controlling the colour of the fog albedo, and making a separate noise pass offset from the main pass in the direction of the key light vector. This made the detail in the fog much easier to see, but it was very hard to justify the expense, and we removed it.

The Results

Volumetric fog hangs in the woods in this pre-dawn scene.  Image courtesy of Room 8.

This ended up being a very successful tool for the lighting department. It was surprisingly versatile, and ended up being one of the most utilized art systems in the game. Wherever there is fog in the playable area, one of these volumes is present. It was utilized in harmony with fog cards and particle systems, and added dimension and mood to all of our levels.

Over time, artists requested extensions or amendments to its functionality. The cheap-and-cheerful construction made it very easy to edit in response to these requests. Over time we tried out different concepts, some stuck, and some didn't. One of the last requests was to add some emissive functionality in order to add magical fog, or to accentuate the fog in areas where adding lighting would diminish the over-all mood.

After the game shipped, Xbox's internal technology group requested a copy of our fog systems, stating that they were impressed with the look of our fog and our ability to run at 60 fps with such rich visuals. This was more due to the tremendous artistic mastery of our lighting and environment teams, but I am very proud that I was able to deliver them tools and options to help them succeed.

Tuesday, February 15, 2022

Hero Hunters VFX Sample


Well, it’s not exactly a ‘reel’, but it will give you a good idea of what sort of VFX work I’ve been doing.  This is a collection of short clips of hero skill and hero screen presentation VFX.

My goals for Hero VFX in Hero Hunters were twofold.  To communicate clearly to the player what was happening and when it was happening, first of all.  Good VFX in my opinion would accentuate the hero art and animation, and also give some insight into the skill design. Secondly, to keep things exciting and enticing for the players by always experimenting with new techniques, and working with programmers to add new features to the engine when needed.

For these VFX, I was kind of a one man band so I came up with the VFX concept, the 2d and 3d assets, the VFX related animations, the materials, the particle system, scripts, and the implementation.  I was also responsible for maintaining visual quality and performance throughout my tenure on the project.

The art direction was already set when I joined the project, so my VFX design had to conform to what was already established.  During this time, I was also working on several prototype projects.  Additionally, I wrote the job description for, hired, onboarded, and led a VFX artist.

Hothead Games decided to sell the IP to DECA.  Also while leading a VFX Artist and doing my normal duties on the project, I played an important role in the due diligence phase of the sale.  I onboarded DECA’s art team by planning and conducting group seminars and also through one on one mentoring.  I was also responsible for documenting not only my process, but animation process, versioning environment (with respect to artist workflow), and scripting capabilities of the engine regarding art implementation and scripted actor behaviours.

The clip without sound is a known issue.  My apologies.

UI Image Exporter

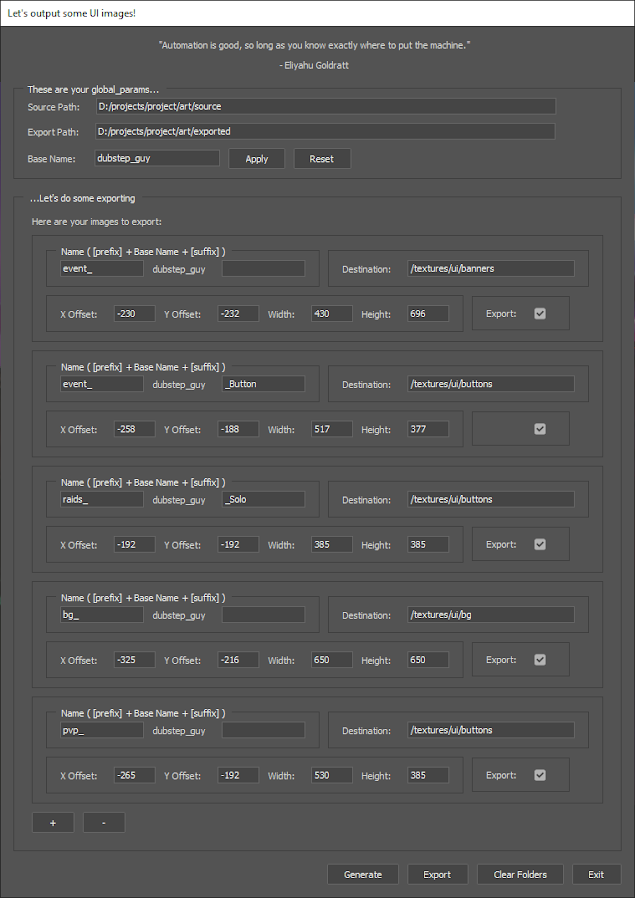
The UI Image Exporter main interface


What is it?

The UI image exporter is a photoshop script that allows artists to take a master image and cut it up into smaller subsections based on user defined profiles, for the purpose of making UI elements such as portraits, buttons, and backgrounds with required dimensions. Before exporting, It allows the artist to edit the subimages in any way they wish in the same document. The script will remember and store changes to the export profiles per master image.

Why is it helpful?

The script is intended not only as a tool to export multiple images from a master image, but also to help with managing the process of editing many output files. The script will create folders that mask out the correct dimensions, and the contents of each folder are customizable by the artist like any other photoshop document.

What’s cool about it, technically?

The script has a partially dynamic UI. It generates UI entries for each output profile, and profiles can be added and removed in the UI. So, the script can work with as few as one output profile, or as many as you need.

The script also works out its cropping dimensions based on a user defined point of interest (POI). The user nominates a POI using a photoshop layer and a brush stroke, and the script will focus on that area when it’s doing its cropping.

How do I use it?

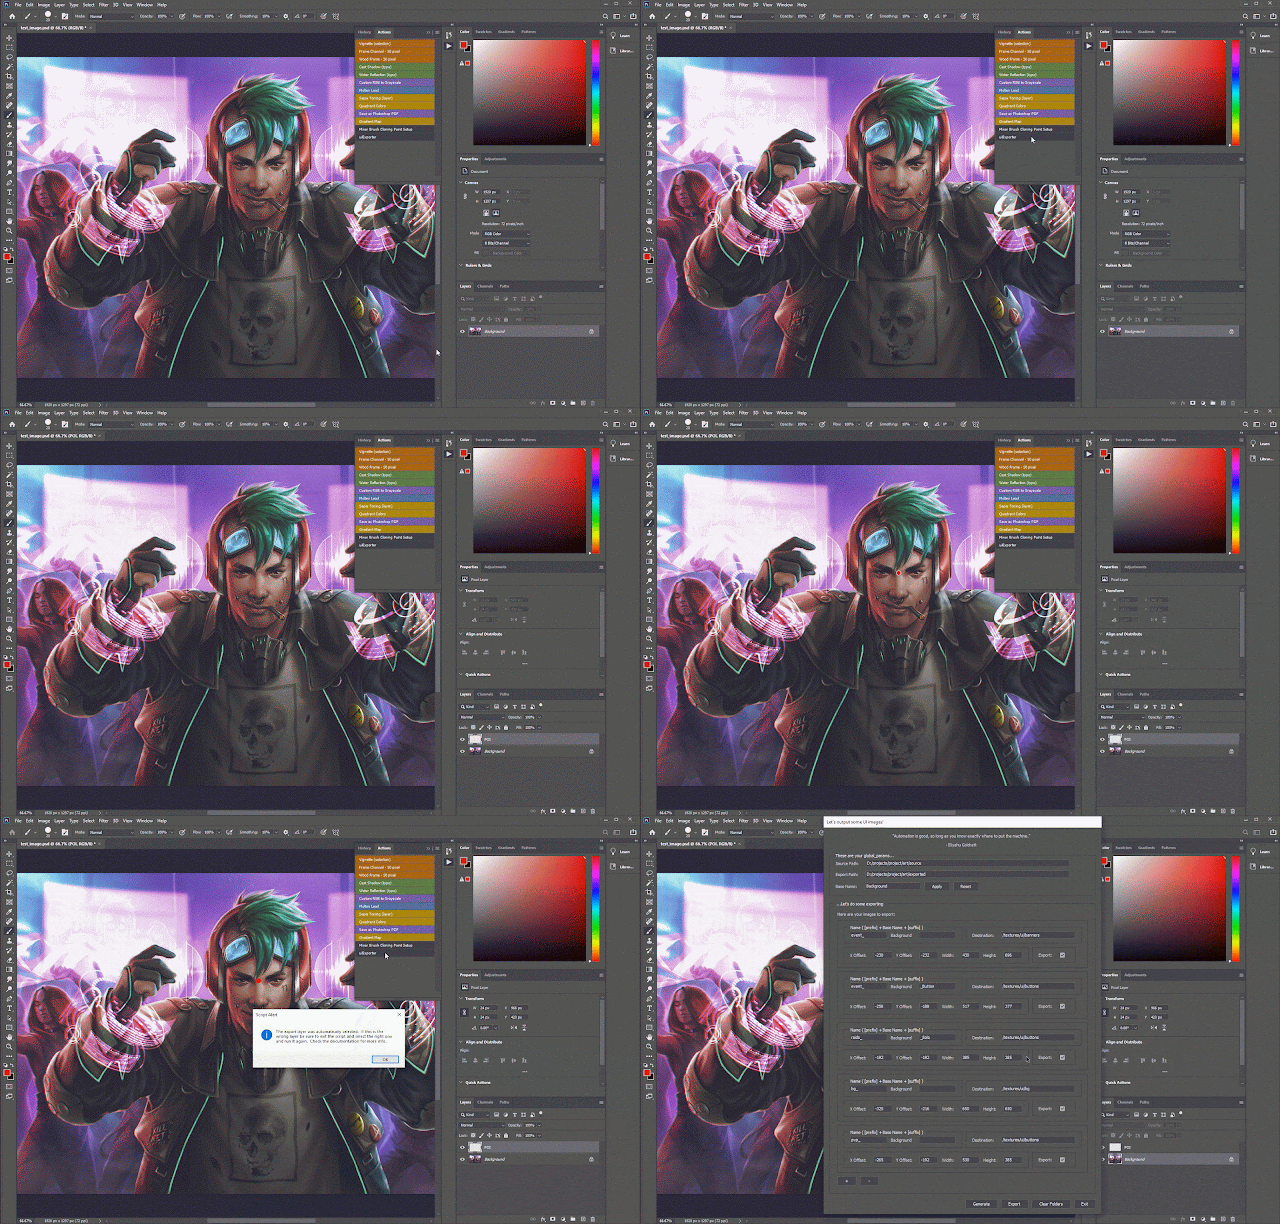
Run the script in photoshop using whatever method you wish. Depending on the state of the master image, it will help you set up your document with the right layers, and then it will show you the UI. This is usually accomplished by running the same script a few times, since you can’t do any editing in photoshop while scripts are running.

First time running

If the document doesn’t have a POI layer set up, then the script will make one for you and ask you to put a mark where the POI should be. If that all goes well, then you can run the script again and it will load the GUI.

The script will create a layer called POI for you.  Place a mark and restart the script.

Second time running

When you run the script with a POI layer, the GUI will appear and you will see three main sections.

Global Params

The global params are at the top of the UI, under the 'quote of the day'.


At the top of the UI there are the global params.  The first two paths are assumed to already exist.  The paths are to the base folder for source art and exported art, ostensibly in some kind of file versioning workspace.

Changing the base name and hitting apply updates all export profiles.

Under the paths is a base name. This is the base name of the textures that will be generated ie. prefix_basename_suffix.png. The base name to start will be the name of the art layer (likely layer 1). Changing the base name and hitting apply will update the export name and the current config. Hitting reset will reset the below export profiles to whatever is in the current config, so any changes in those profiles in the ui will be lost.

Export Profiles

Below that is a box of export profiles. Each profile has text boxes for a file name prefix, suffix, and export destination, offsets relative to the POI position, target ui element dimensions, and an export checkbox.  These details would normally be decided on ahead of time, but they can be edited in the UI, and the settings are saved out alongside the psd.

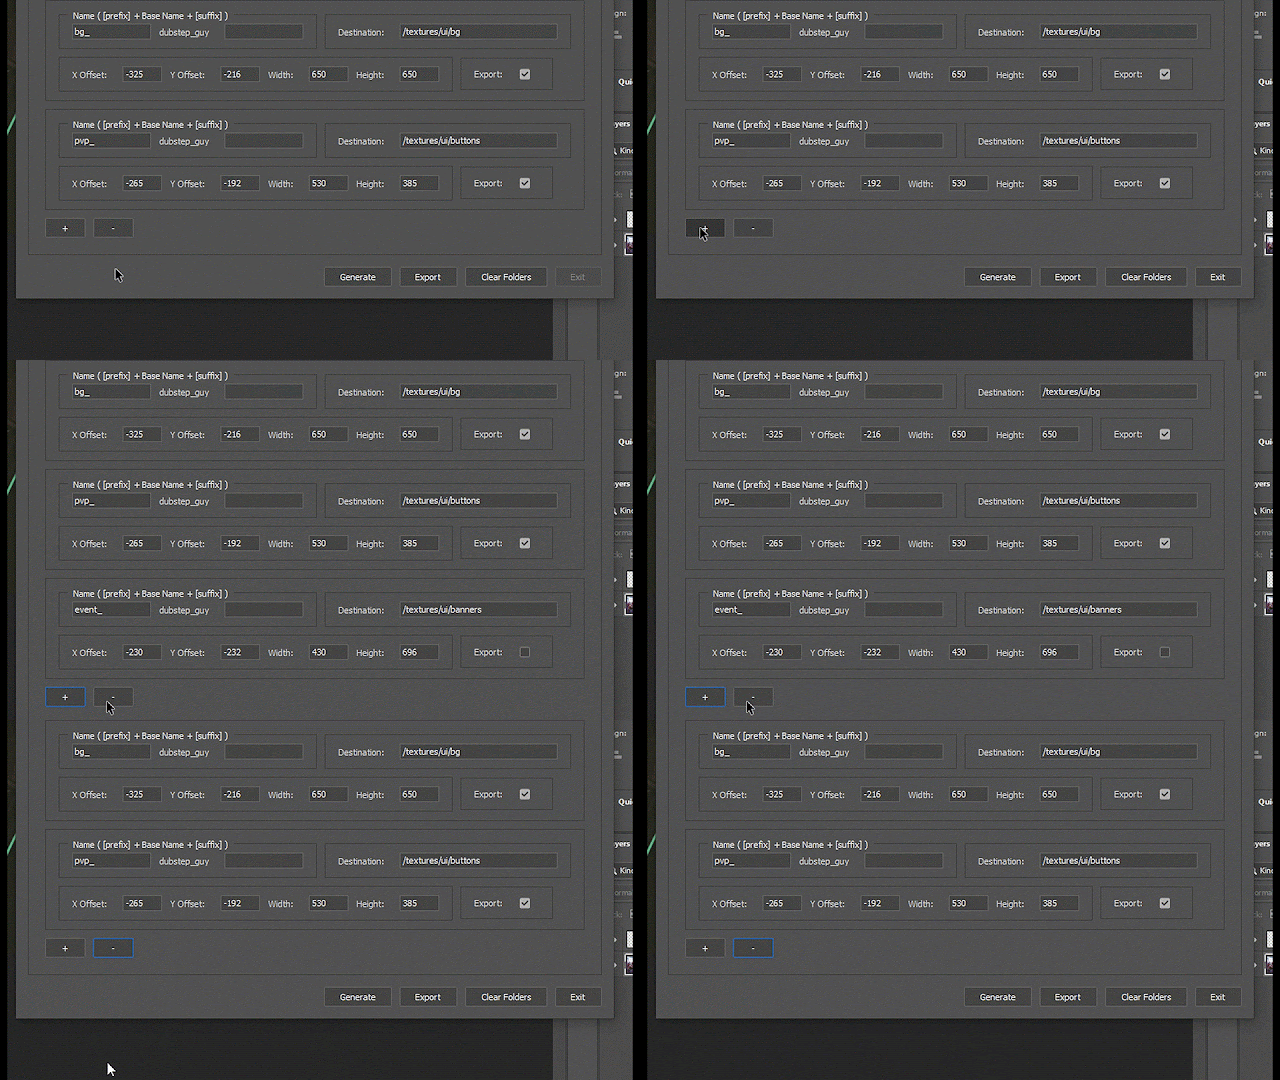
Profiles can be added and removed using the [+] and [-] buttons below.

You can add and remove profiles dynamically.


Script Functions Buttons


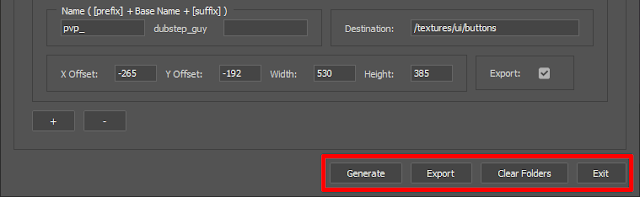
The business end of the UI.

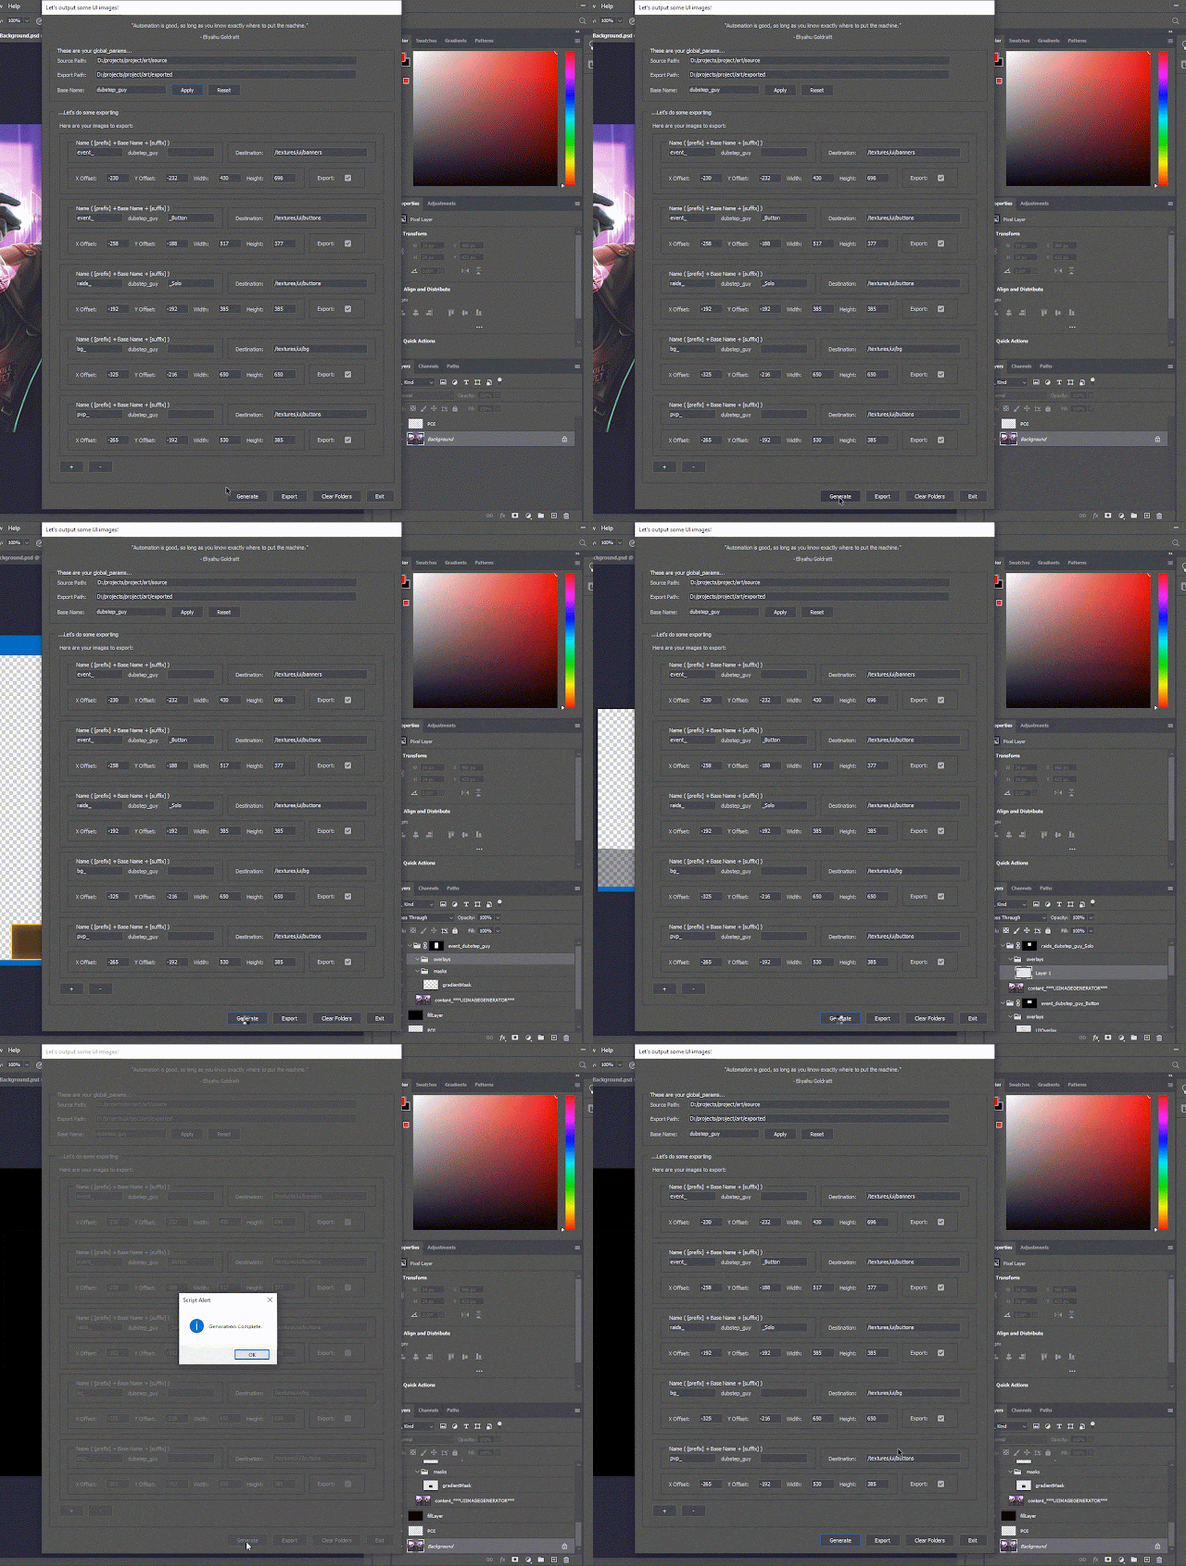
At the bottom there are 4 buttons to activate script functions.  The generate button will generate photoshop folders and masks based on the specifications of each export profile.  


Clicking generate creates a folder with a mask for each output profile.

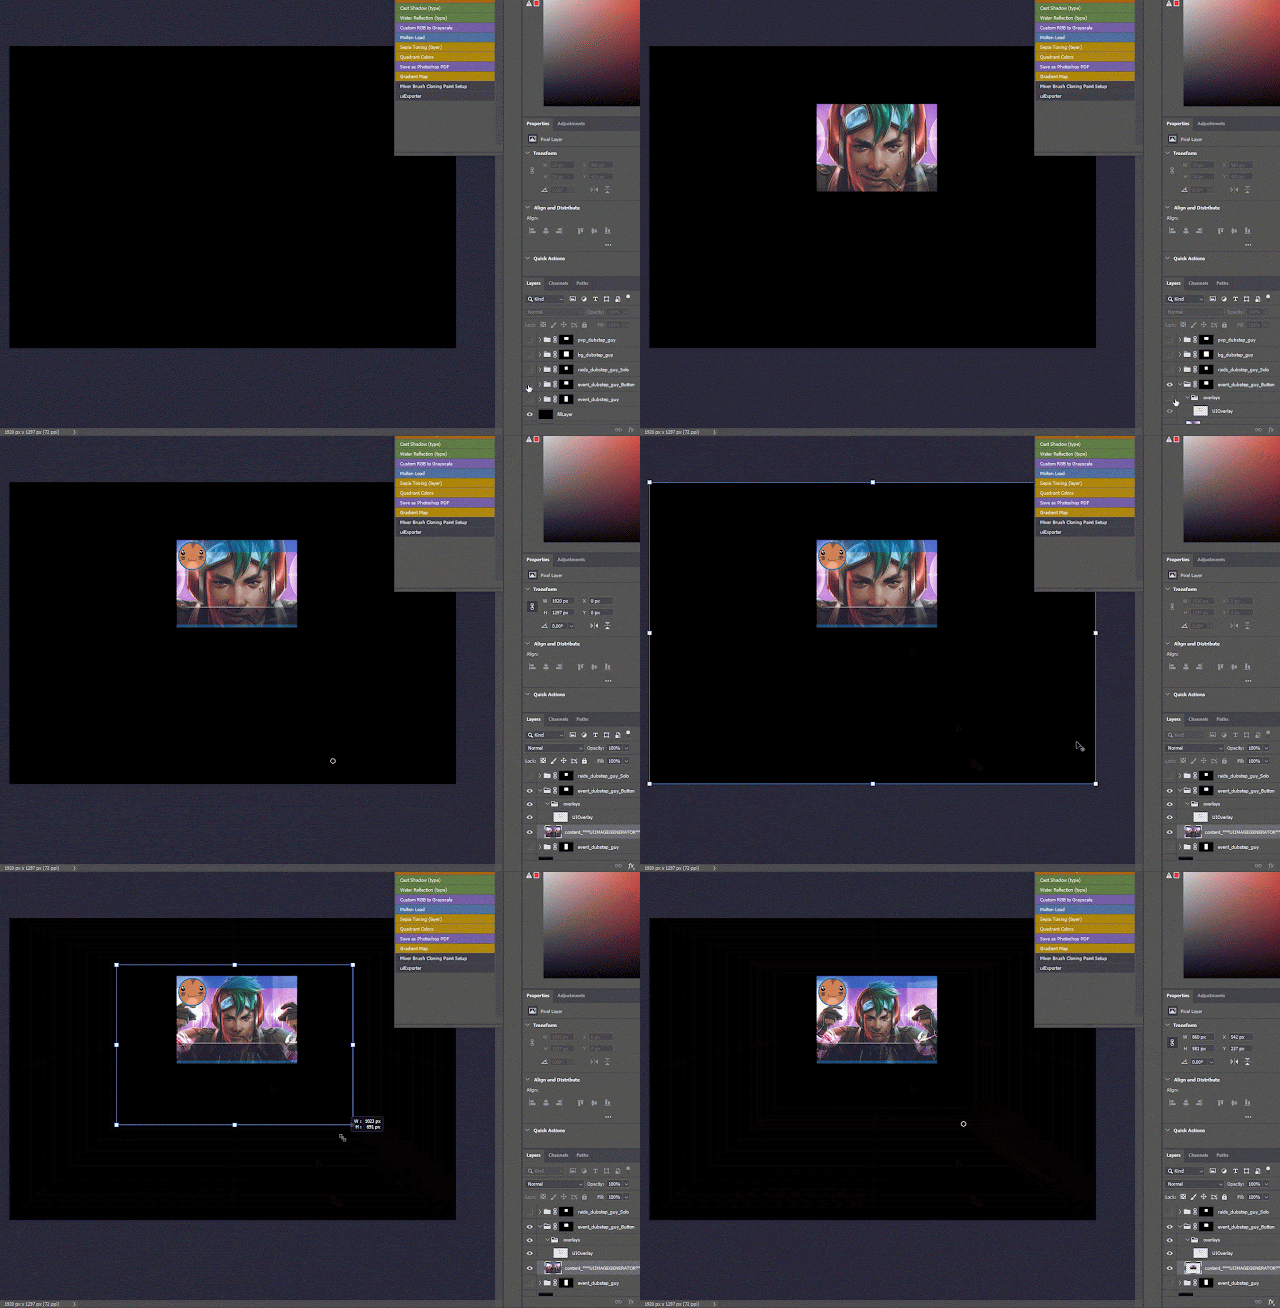
Once the export folders have been generated, the artist has the opportunity to edit the contents of the folder.  If the image composition has to work with other UI elements, they can be added as overlays by the script. Masks can also be added, which would be exported with the UI image.

The artist can edit the composition of the UI panel.  Overlays can be added if the image will be under other UI elements.

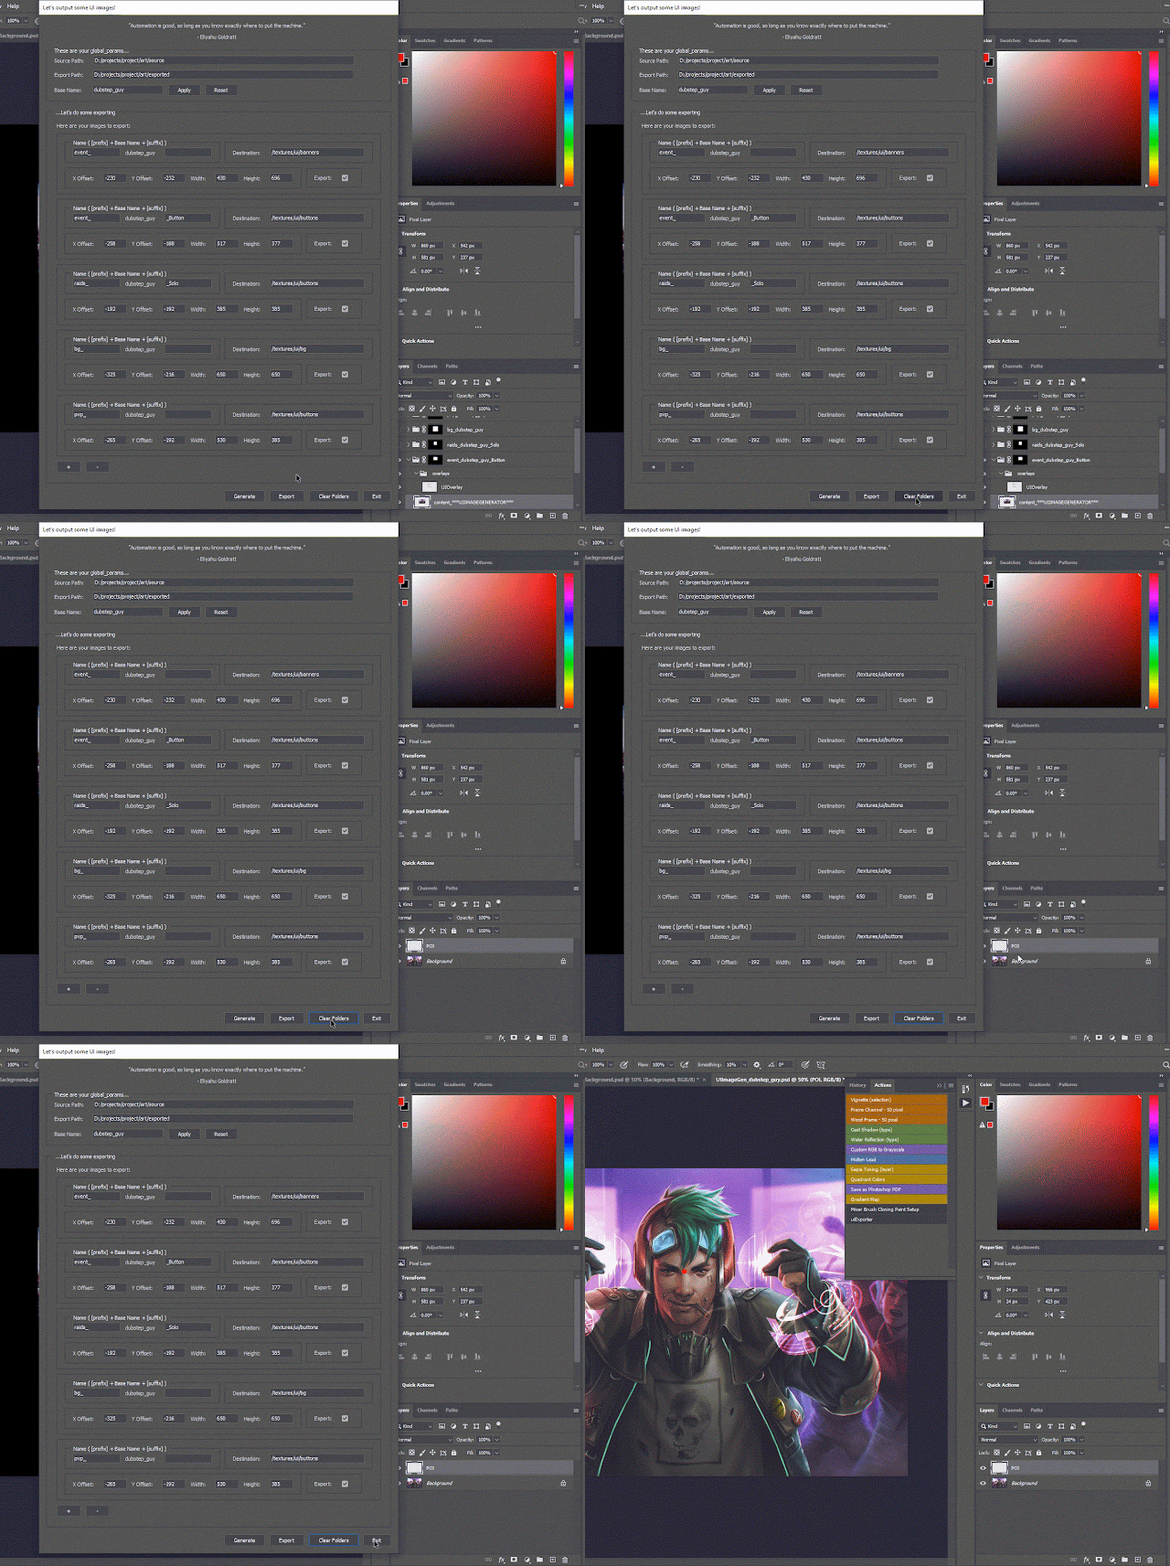
Clear folders will delete any folders created by the script so the artist can start fresh if needed.  And exit exits the script.

The artist can clear all the folders the script generated if desired.


Third time running, the final export

After evaluating the composition of each folder, the artist can fire up the script again to do the final export.

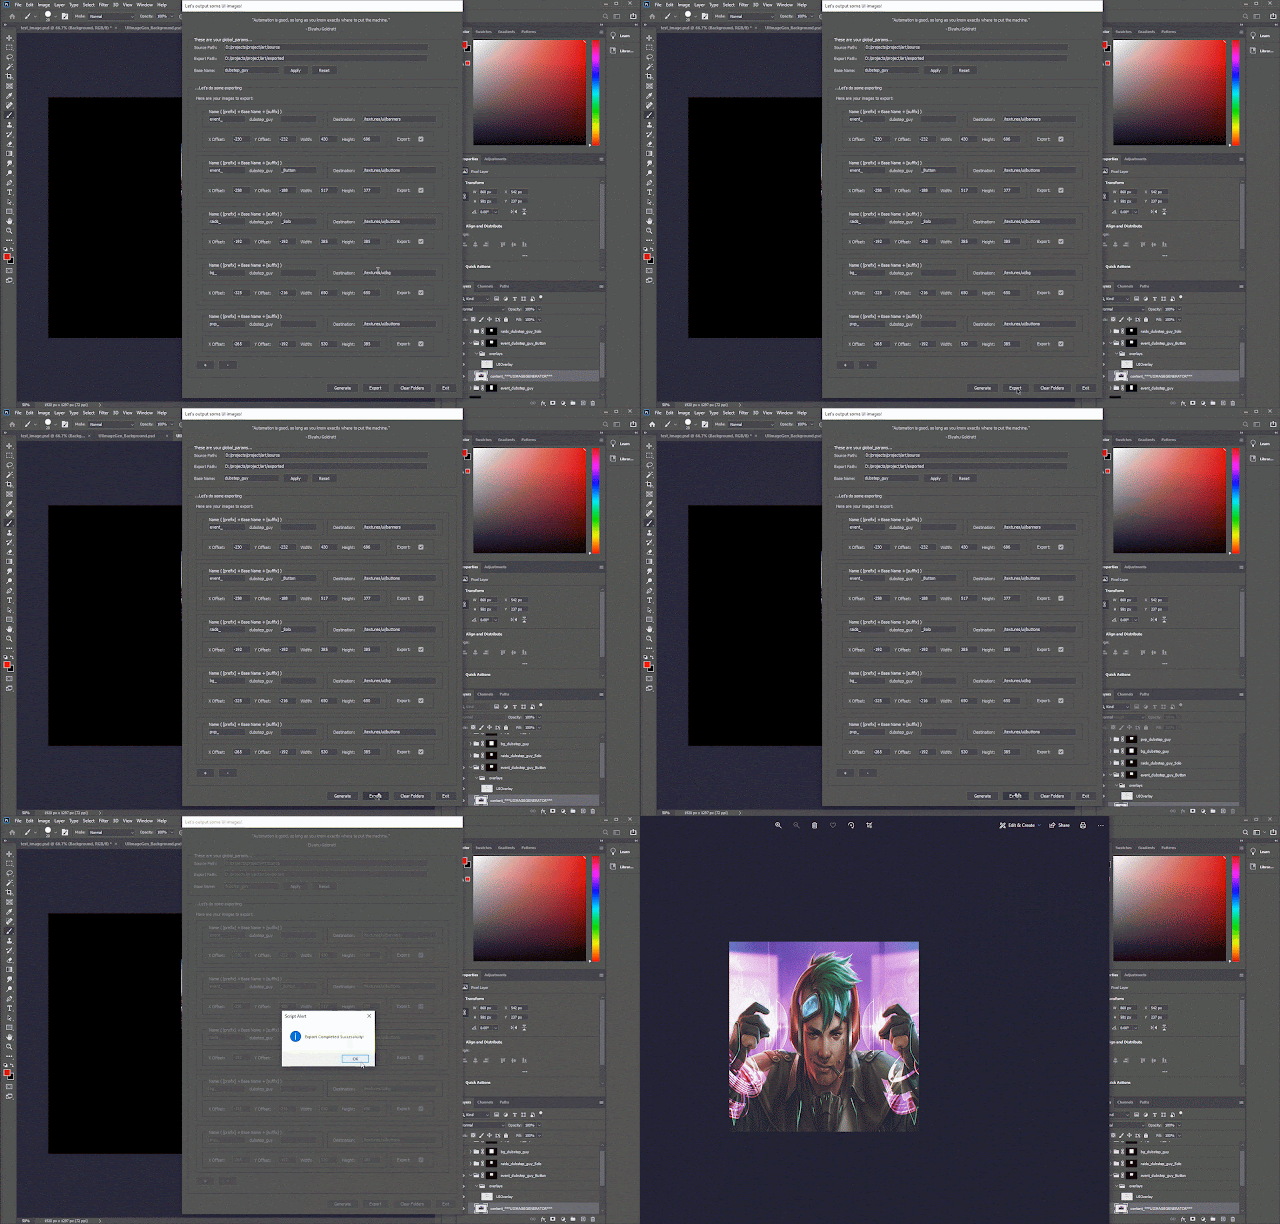
The export button will export each of the export folders once they are generated and tweaked by the artist.  Any overlays that were left on will automatically be turned off.  The resulting images will be converted to the next highest SPOT resolution.

The script will export any folder with the export checkbox enabled.


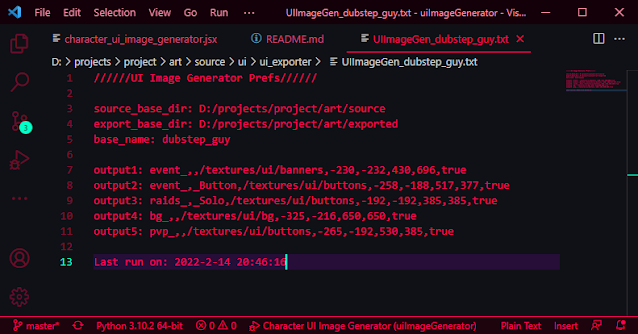
At this point, all of the export targets are in the correct folders, and the script has created a photoshop document in the source art folder.  The artist can save the changes they made.  The script remembers any changes in export settings so when the script is opened while a previous psd is open, it will recall the previous settings.

The config file is in a format that is easily human readable, and of course, if it is edited by hand, those changes will be reflected next time the script loads the config.

The config is designed to be easy to read.


Input and output

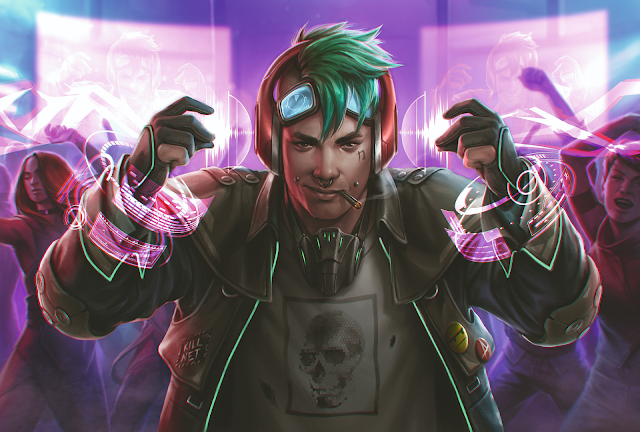
Firstly, I want to acknowledge profusely that the image I used to demonstrate the process is not mine.  It was created by an artist named Matt Zeilinger.  The image is from a character art tutorial, using a character from a game called Netrunner.  The image came up in a google search looking for character art.  The reason I chose this image is because it has the kind of composition that works well with the script.  So, all artistic props to Matt Zeilinger.

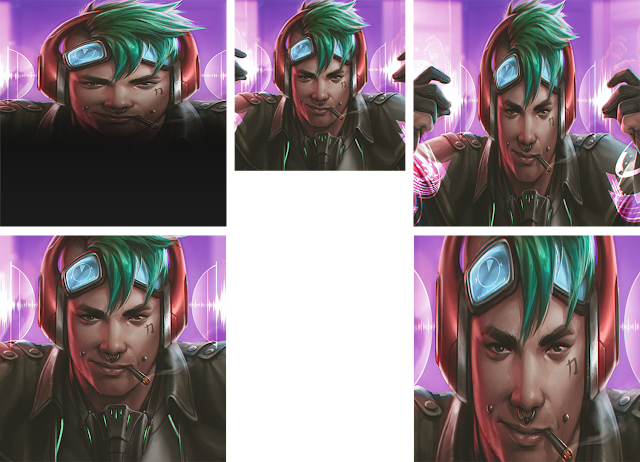
So, from the excellent image by Matt Zeilinger, we have various outputs with different dimensions, compositions, and masks, all done in under ten minutes without digging through menus, having to recall dimensions for UI elements, or anything like that.  The images are ready to be uploaded using any version control software.

Input

The glorious character art by Matt Zeilinger.  Used here for demo purposes only.


Output


The various output images.  Notice the mask on the top left, scooped up by the script.


Check out the script on my github project!

Monday, February 14, 2022

Free Games Bot


The Free Games Bot output in my discord channel

This is a little project that I made in my spare time. My goal was to learn more about python scripting by trying to make it ‘do things’. Free games bot is a script that interfaces with the API of a game sale aggregating website called IsThereAnyDeal.com, sorts the payload it receives as a result of its search parameters, and then posts the results on either slack or discord channel using webhooks.

It can be run manually, or can be added to the windows task scheduler to be run as often as you wish.

The search parameters and other information are loaded from a json file. The settings json can have more than one bot profile in it. Multiple profiles can be used to post to multiple channels using different webhooks urls, to store different search criteria or both.

Each profile records what it found last session in a json. Since it remembers what it found last time, the likelihood of repeat posts is reduced.

Bot Settings

The settings JSON may contain multiple bot profiles, each with their own unique settings and discord or slack channel targets.

ITAD API Parameters

The API Parameters are key value pairs that are sent to the ITAD web API to specify what data you want to receive in the payload.
  • key: The API Key from ITAD.
  • offset: The position at which to start the search. ie. From the 500th entry.
  • limit: The number after which to stop. ie. After 4000 entries.
  • region: Filters results by countries within a region.
  • country: Filters deals by country, as well as determines the currency conversion.
  • shops: Filter by specific shops. This is set programmatically by the script based on the store filter.
  • sort: Criteria to sort by. ie. By price cut in descending order.

Other Parameters

  • web_hook_address: The address of the webhook from your discord channel.
  • store_filter: Can either exclude or include shops from the complete list of shops. The value here will inform what gets sent to the ITAD API.
  • game_filters: The script will go through the data downloaded from ITAD and filter it based on criteria.
    • min_discount_percent: The minimum discount to report in percent.
    • min_price_old: The minimum before-sale price to report in dollars.
    • max_price_new: The maximum sale price to report.
    • exclude_keywords: Any problem keywords in game titles you don't want to hear about.
  • tracking_json: The filename of the tracking json to be created. It's so you can give a unique name to your record per profile. The record is the bot's memory of what it posted yesterday.

You can check out my project on github!

Tuesday, June 12, 2012

My Demo Reel

Here is my demo reel.


For best results, click the youtube button and watch it in HD.

It is a combination of in-game footage shot with fraps and rendered scenes, composited in After Effects.

Sorry for the ads if you see them.  They are there because I chose to use music which, while excellent, is not made by me.  It's not that I'm trying to monetize my own demo.  I think it's a pretty fair trade off.

The in-game scenes were shot with a fair degree of scripting and other methods to cajole the game to behave more like a movie set.  I had a narrative in mind and I shot a lot of footage but the story was too cumbersome for the reel, so I'm going to finish it as a machinima, time permitting :)

The AH-1, my biggest project to date

The AH-1 in Vray

This model is by far the biggest project I have ever taken on.  In retrospect, it may have been a little too big!  There were many challenges relating to reference and the level of accuracy I wanted.  Eventually, I was able to get an actual combat pilot to give me some additional reference and pointers.

I made a bunch of alphas for different kind of screws and bolts, and had to experiment a great deal to get the right texture for all of the various  materials.  This model is a simulator type 'hero' model, with a fully detailed interior for both crew stations.  In the game it has as many working dials as I could make.  Operation Arrowhead isn't a flight sim so there are a few unused ones.  The model is almost entirely hand painted with some photo reference / grunge textures used to make the matte paint look more scuffed up.

The dash of the pilot's 'work station'.  You can see a little of the
condensation streaks I put on the windows.


The gunner's 'work station'.

The in-game asset has ten visual LODs, including two 'pilot view' ones, four shadow volumes, and several other hit locations.  The Real Virtuality engine allowed me to apply different materials to different locations of the LOD that interacts with the ballistic and damage simulations, so the various armour plates, engines, transmission, rotors, etc all have different abilities to stop or deflect different kinds of bullets.  Additionally, the engine, transmission, tail rotor, systems, and turret may each be damaged or destroyed with different effects for each.

The first resolution LOD of this model has 10k points and 10k faces.  It has 15 sections with its various proxies, and flare textures.  The exterior of the model has 2 textures, one for the fuselage, and one for everything else, and the interior has 4 to keep the text legible.

It is difficult to characterize the work and fiddly detail went into this project and its various features, don't feel shy to ask questions about it.  More shots are available on my Picasa Album.  Be sure to check out the descriptions :)  All of the shots in the album are from the game engine model viewer that comes with the community tools, so it is more or less how it looks in game.


https://picasaweb.google.com/105138191083148456220/ThingsYouMayHaveMissedAboutTheAH1?authuser=0&authkey=Gv1sRgCJ2Tmde_yajEeg&feat=directlink